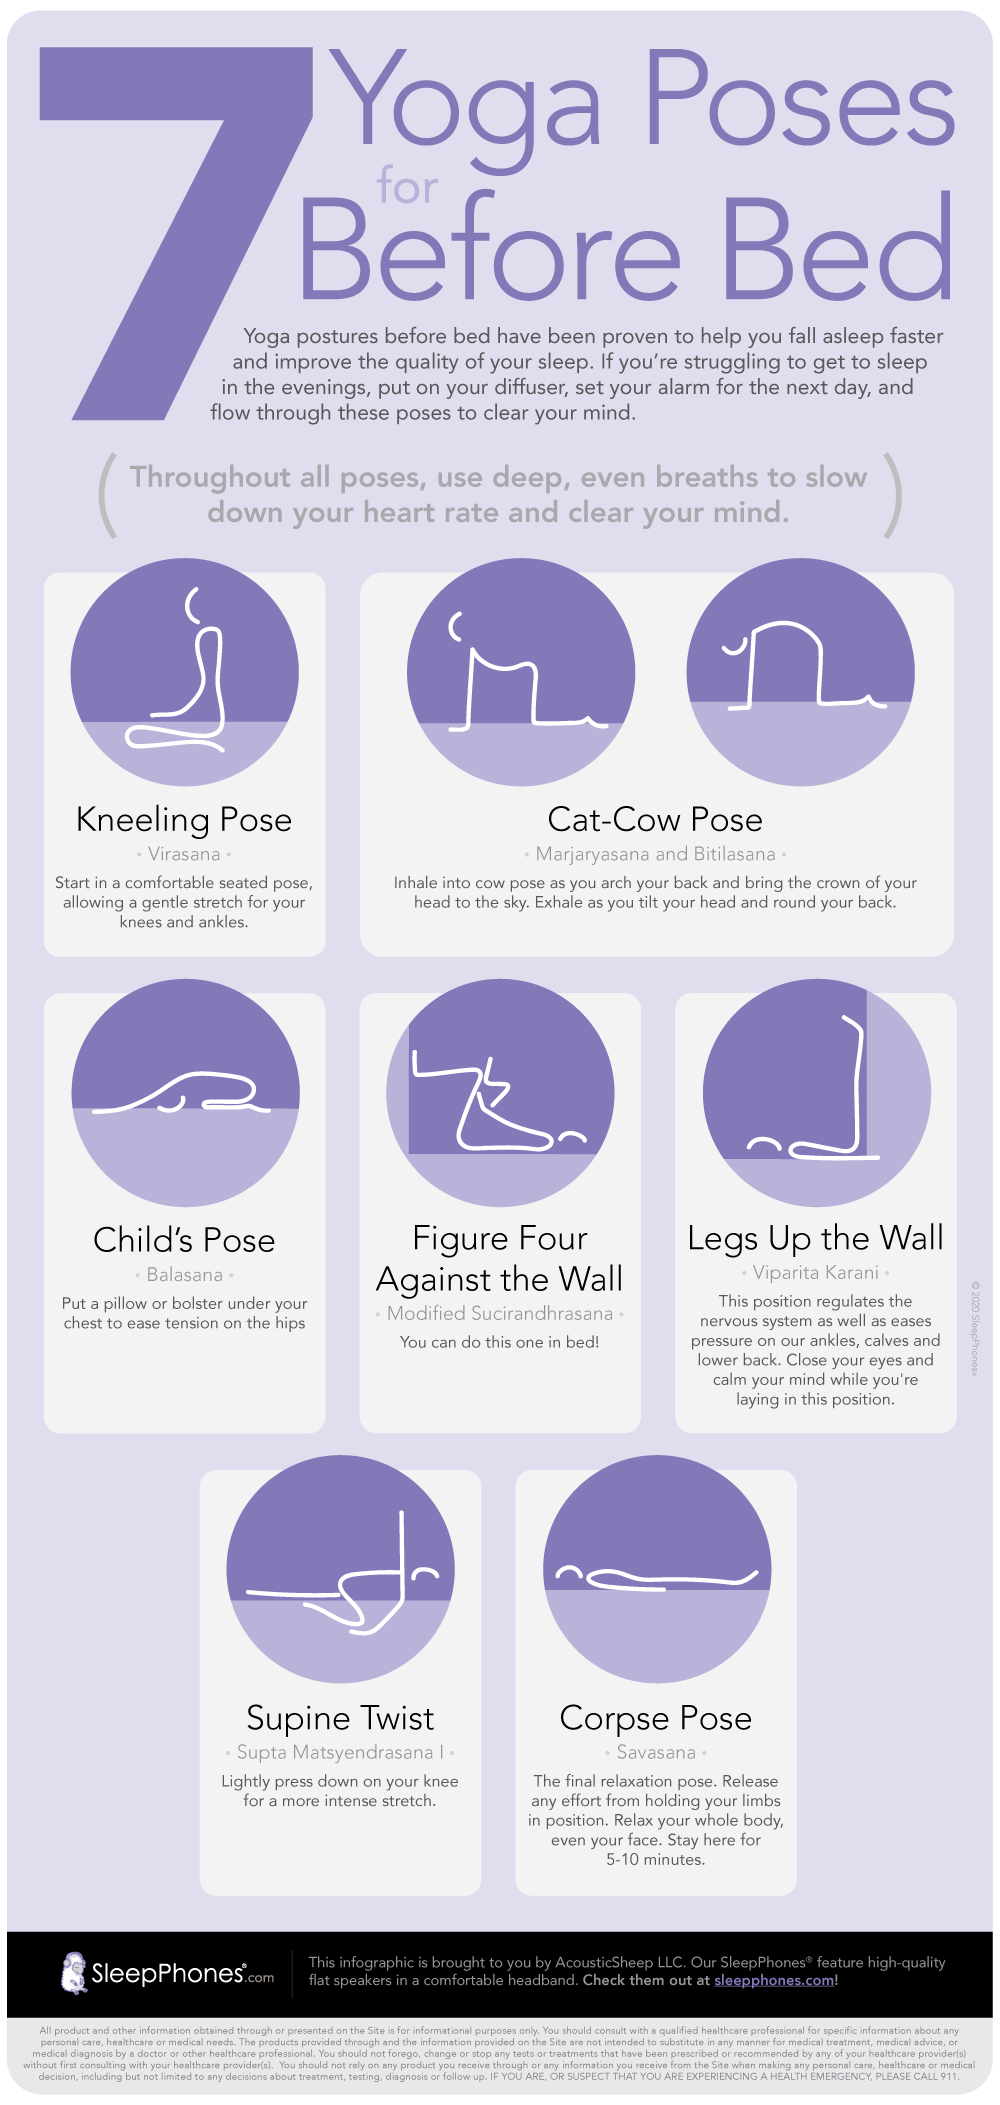
Yoga Poses for Before Bed
Fall Asleep Faster—and Sleep Better—with These Easy Before-bed Yoga Poses
Science has shown that yoga can reverse the stress response, loosen the body, and encourage better breathing. But beyond the obvious physical benefits, yoga has a greater purpose. It makes the mind more aware of itself and the body, thereby strengthening your will against physical and psychological discomfort.
Here we've included 7 poses that people new to yoga can practice before a nap, after a long day, or prior to bed. With time, you will find it easier to sleep without racing thoughts or aching muscles. Incorporate these poses into a vinyasa, or "flowing sequence," and transition effortlessly from one pose to the next.
And for added motivation, wear SleepPhones® headphones. Forget the pain of other headphones and earbuds as you move around—because our headphones are the only way to practice yoga comfortably. Let the soft, cushiony headband keep hair out of your face while the thin, high-quality speakers deliver a tranquil listening experience. Enjoy music, podcasts, audiobooks and more as you stretch, balance, and breathe. Then, head straight to bed, letting the tunes and the softness of our proprietary SheepCloud™ fabric lull you to sleep. With 24-plus hours of battery life, you'll have more than enough time for that much-needed pre-bed warmup.
Read more about each pose below, referring to this helpful infographic. For easy memory, print it off and put it on your fridge or in your home office. You'll be glad you had it after a long, tiring day when all you want is to relax.
"[My] friend Cole and I both use SleepPhones to listen to ambient music/white noise … Breathing exercises while already laying down have also rly helped me!!" —Emmett (@breadpupy)
1. Kneeling Pose (Virasana)
In Sanskrit, this pose is known as virasana, or the hero pose. The pose is characteristic of how children kneel, with their feet to the side of their hips rather than under their buttocks. But the vertical alignment of the spine and the openness of the chest is what gives this posture its heroic flair.
If you look at this pose and think, "I can't sit like that anymore!" we totally understand. Believe it or not, the kneeling pose is a great gateway into yoga because it loosens your hips and knees for use in other poses. With time, it will not only focus your mind but also discipline your body to work through discomfort—another good reason to call it the hero pose.
The pose should feel tight or slightly uncomfortable, as that shows that you are truly targeting your joints and limbs. All you need to do is kneel on the floor, lean forward with your hands, move your legs out to the sides, and then sit up straight. Make sure to keep your stomach tight, your hands in your lap, and your knees together. If you find it difficult at first, try sitting on a pillow or a bed, or try folding a towel or a mat behind your knees. Practice until you find it easier to kneel on the floor alone.
Click here for further instructions on the kneeling pose.
2. Cat-Cow Pose (Marjaryasana-Bitilasana)
Despite being two separate poses, marjaryasana and bitilasana are often done in succession. The first is characteristic of how cats stretch with their backs arched and their heads down. The second, of how bovines stand with their stomachs dipped, their necks stretched, and their limbs extended. Considering that one animal was worshiped in ancient Egypt, and the other in India, they both must be doing something right.
Start with the cow pose, then counter it with the cat pose. On the floor, extend your legs and arms while keeping them in-line with your hips and shoulders. As you inhale, dip your stomach towards the floor, lifting your head and chest toward the ceiling. When you exhale, slowly arch your back and dip your head. Repeat this a few times until both your mind and body are relaxed.
These poses can help relieve tension in the back and neck. Just be sure to relax your shoulders and not have them up to your ears. Also, avoid craning your neck back or touching your chin to your chest. Above all, transition between both poses naturally, without forcing yourself into either one. Go only as far as your body is able.
Click here for further instructions on the cat pose, and here for the cow pose.
3. Child's Pose (Balasana)
This pose is representative of pranama in Indian culture. To show respect, people will kneel, extend their bodies forward, and touch the toes of another person. In yoga, this pose becomes known as the balasana, or the child's pose. The idea of respecting one's elders is still there in the name, even if the meaning has changed for a Western audience.
Unlike the kneeling pose, the child's pose lets you sit on your feet. Start by forming a v-shape with your big toes touching and your knees separated. Then, lean your upper body forward, either stretching your arms out in front of you or resting them behind you. After a few minutes, stretch out your torso and slowly re-enter a sitting position, letting your tailbone do the work.
While the child's pose helps you stretch your back, it is mainly intended to offer a moment of stillness and reflection. Take this moment willingly so you can transition from the hustle of the day to the quietness of sleep. Even for just a few seconds, return to a childlike state, surrendering yourself to the wonder of living. Your mind—and muscles—will thank you for it.
Click here for further instructions on the child's pose.
4. Figure Four (Modified Sucirandhrasana)
The Sanskrit name for this pose, sucirandhrasana, translates to "eye of the needle." Essentially, you lie on your back and cross the ankle of one leg over the thigh of the other. This forms a hole between your legs that, when crossed, also looks like the number 4. You then lift the second leg off the floor, "thread the needle" with the adjacent hand, and then pull it towards you.
The figure-four pose can be difficult if your hips, back, and hamstrings are tight. So, we've modified this pose for beginners who may have a hard time taking their legs off the floor. Instead of lifting the crossed-over leg into the air, rest it against the wall for support, keeping your shin parallel to the floor. Then, ease into the pose until you feel it working deeply, moving your hips closer to or away from the wall as needed. You can otherwise perform the pose on your bed and use the headboard for support.
The figure-four pose will help you release tension in your lower body, such as your hips, thighs, and back. Just be sure not to force the pose, and don't lift your head, hips or back from the surface you are lying on, either. And because the wall or headboard is doing the work for you, let your arms rest comfortably overhead or on your stomach. This gives you the chance to focus on your breathing.
Click here for further instructions on the figure four pose. Look under number 3, "Ankle-to-Knee at Wall."
5. Legs Up the Wall (Viparita Karani)
Viparita karani, which roughly translates to "inverted action," is yoga's reset button. When we sit or stand all day, blood and lymphatic fluid travels to our pelvis and legs, making our lower body feel swollen and our upper body feel drained. By encouraging these fluids to recirculate, this pose can alleviate pain, boost energy, and relieve stress. All these benefits can lead to deep, rejuvenating sleep.
Start this pose by sitting next to a bare wall. For support, place a pillow, cushion or folded blanket where your tailbone and head will be. Lie down on your side, then turn your body over while pivoting your legs upward. Once your legs are pointing up, maneuver until you feel comfortable: prop up on your elbows, move the pillow or blanket around, and then settle into the pose again. After you've been in the position for 5, 10 or 20 minutes, curl your knees toward your chest, then turn on your side to exit.
If you use supports, make sure your torso remains parallel to the ground. Your chest and arms should be opened wide, and your chin should not be tight against your chest. And, most importantly, either close your eyes or keep them partially open. Focus on the rush of calm energy traveling back to your body's center. Only then can the stress response be reversed.
Click here for further instructions on the legs-up-the-wall pose.
6. Supine Twist (Supta Matsyendrasana)
This pose is named after the founder of hatha yoga, Matsyendra. According to legend, Matsyendra was swallowed whole by a fish and taken to the bottom of the ocean. There, he eavesdropped as the god Shiva taught his consort, Parvati, about the secrets of yoga. After twelve years of learning and practicing these secrets, he emerged from the fish, ready to spread these teachings.
Although Shiva named Matsyendra the "Lord of the Fishes," the pose itself does not resemble anything fishlike. The twisting of the body is symbolic of turning the heart and mind from its usual forward-facing direction and towards the back. In other words, it promotes reflection on the subconscious mind, going underneath the surface of where our consciousness usually swims. The pose is also a great way to free up your hips and spine just before you go to bed.
The original pose itself looks complicated. Luckily, a version of this pose— supta matsyendrasana—allows you to lie down without much contortion. Start by lying down on your back, with a pillow or folded blanket behind your head if needed. Relax your shoulders and hips down toward your feet, and adjust the rest of your body until you feel comfortable. Then, straighten the left leg and curl the right leg toward your chest. After waiting a minute, roll this leg over to the opposite side, following its motion with both arms.
Here comes the twist. With the left hand, lightly press on the knee of the right leg that you have now crossed over. Stretch out the right arm, and slowly arch it above your body, letting it fall gently to the other side. Follow its motion with your chest and head. Your legs should now be facing the left side, your head and arm should be facing the other, and your spine should be tight in the middle. Lay here for a few minutes—letting gravity take over—before you switch to the other leg.
Click here for more information on the supine twist.
7. Corpse Pose (Savasana)
This pose isn't as morbid as it sounds—nor as easy as it looks. Savasana, or the corpse pose, signals the end of the yoga routine. In it, you effectively "play dead," relaxing not just the muscles in your body but also in your face. And even when you're just lying there, creating stillness in your mind and body can take a while to master.
Lie down, close your eyes, and feel the heaviness in your muscles. Imagine a line running over your body: from your head, through your arms, and down to your feet. At every point it touches, loosen the muscle and let gravity take over. If your thoughts travel, observe where they go, then gently guide them back to the sensations in your body. Remain here for a few minutes or as long as you need. When you're done, roll over on your side, take a few more deep breaths, and slowly lift yourself up with your arms.
Like any other pose, the corpse pose can still be uncomfortable for some—physically and emotionally. If you feel too vulnerable opening up your body, curl up your knees or put your hands on your chest. If you don't like being in the dark, keep your eyes partially closed. And don't worry if you fall asleep—this shows the pose did more than it needed to help you relax.
Click here for further instructions on the corpse pose.
For more, check out our blog post about how yoga helps you sleep better.